Template to Core - Setup & Initial Deployment of a Parachain
This guide is considered a moving document and currently uses the Paseo testnet. This guide is also applicable to the parachains on the Kusama relay chain, as coretime is also enabled there.
This instructions on this guide are applicable for the Polkadot SDK repository with tag
polkadot-v1.15.1
This guide aims to get you up and running with the basics of:
- Compiling and configuring your first template
- Obtaining Coretime (bulk or on-demand)
- Deploying your template on your procured core
Getting ROC and Reserving a ParaId
Before starting to work with coretime, you'll need some ROC tokens to pay fees, reserve a ParaId, and more.
Head over to Polkadot-JS to reserve a ParaId. We'll need a ParaId to upload our parachain's code:
- Get the Polkadot-JS Web Extension.
- Create a wallet, and get some ROC via the faucet. with your new address.
- Go to the Polkadot-JS Web App, and make sure you select Paseo as your network via the tabs on the side or visit this link to get to Paseo directly
- Head to Network > Parachains > Parathreads (the tab)
- Follow these instructions to reserve a ParaId.
Visit the Accounts tab to view all registered accounts and associated balances within the Polkadot-JS Extension. Once finished, you should see your new ParaId at the bottom of the list within Network > Parachains > Parathreads with the option to "Deregister" to the right:

Compiling Parachain Runtime and Generating Wasm Blob
We can now move on to working with the template. Essential prerequisites are:
- Have a command line, git, and other common development tools to edit code/files.
- Rust, its associated tooling, the nightly toolchain, and the
wasm32-unknown-unknowncompilation target.
Visit the dependencies' installation page before starting.
This guide uses release
polkadot-v1.15.1, for
associated tooling (such as polkadot-parachain and chain-spec-builder).
We will be using the Polkadot SDK's parachain template, which is mirrored in the templates folder within Polkadot SDK repository.
Clone the repository:
git clone git@github.com:paritytech/polkadot-sdk-parachain-template.git
Now, navigate to polkadot-sdk-parachain-template/:
cd polkadot-sdk-parachain-template
Open this in your code editor of choice. This template contains the necessary dependencies we need to utilize a core.
Compiling the Parachain Template Node
This tutorial won't go into the specifics of the template, nor will it go into the specifics of FRAME and Substrate. All you need to know is the following:
runtime/- Contains the runtime and business logic. This is how all of your pallets (runtime modules) are configured. The runtime, once it's compiled as a WebAssembly blob, is uploaded on-chain.node/- The node implementation, which takes care of networking and RPC setup.
Pallets are essentially just Rust crates, which are imported as dependencies, as seen in
runtime/Cargo.toml. Read more about pallets here.
When we compile our template, we can extract the runtime code as a WebAssembly .wasm blob, which
is one of the key artifacts for registering our parachain on the relay chain.
Build the node using the following command:
cargo build --release
For the sake of this example, we won't go into adding or modifying any pallets. However, this is definitely a next step after you get used to deploying your parachain.
Customizing our chain specification's patch file
The chain specification is a JSON file that describes Polkadot SDK-based networks. It usually
contains the genesis runtime (in hex) under genesis.runtimeGenesis.code and also contains genesis
values/state for the pallets included in your runtime.
You can bootstrap your network with some initial values, such as initial collators, balances for
certain accounts, and more. This is done using a patch file, which the chain-spec-builder tool
uses to create the full chain specification of your network. You should do the following to create
your patch.json:
Feel free to use the patch provided here, which you can look to tweak to your liking.
- Create the file:
touch patch.json - Paste the below patch JSON.
The patch JSON states that:
- The
AliceandBobaccounts get a substantial balance. Aliceis the collator and block producer of this network. This makes it easy for us to run our collator with--alicelater on.Aliceis the sudo key of our network.
YOUR_PARA_ID_HERE with your reserved ParaId!This should be the same as the ID you reserved.
{
  "balances": {
    "balances": [
      ["5GrwvaEF5zXb26Fz9rcQpDWS57CtERHpNehXCPcNoHGKutQY", 1152921504606846976],
      ["5FHneW46xGXgs5mUiveU4sbTyGBzmstUspZC92UhjJM694ty", 1152921504606846976]
    ]
  },
  "collatorSelection": {
    "candidacyBond": 16000000000,
    "invulnerables": ["5GrwvaEF5zXb26Fz9rcQpDWS57CtERHpNehXCPcNoHGKutQY"]
  },
  "parachainInfo": {
    "parachainId": YOUR_PARA_ID_HERE
  },
  "polkadotXcm": {
    "safeXcmVersion": 4
  },

  "session": {
    "keys": [
      [
        "5GrwvaEF5zXb26Fz9rcQpDWS57CtERHpNehXCPcNoHGKutQY",
        "5GrwvaEF5zXb26Fz9rcQpDWS57CtERHpNehXCPcNoHGKutQY",
        {
          "aura": "5GrwvaEF5zXb26Fz9rcQpDWS57CtERHpNehXCPcNoHGKutQY"
        }
      ]
    ]
  },
  "sudo": {
    "key": "5GrwvaEF5zXb26Fz9rcQpDWS57CtERHpNehXCPcNoHGKutQY"
  }
}
Generating the chain specification
Ensure you have the
chain-spec-builderinstalled before following along!
By now, you should have patch.json created and populated, and your ./target folder should look
something akin to:
./target/release/wbuild/parachain-template-runtime
├── Cargo.lock
├── Cargo.toml
├── parachain_template_runtime.compact.compressed.wasm
├── parachain_template_runtime.compact.wasm
├── parachain_template_runtime.wasm
├── src
└── target
We'll be using parachain_template_runtime.wasm in conjunction with chain-spec-builder to build
our chain specification:
chain-spec-builder create \
-v \
-r ./target/release/wbuild/parachain-template-runtime/parachain_template_runtime.wasm \
patch patch.json
You should now see chain_spec.json generated, with the message Genesis config verification: OK.
The -v does a superficial verification of the JSON to ensure all fields are properly populated.
Next, you'll need to modify a few things in your chain spec, namely by adding the following fields
to make it parachain-ready. Once again, make sure you set para_id to the one you reserved earlier:
"protocolId": "my-live-protocol",
"properties": {
   "ss58Format": 42,
   "tokenDecimals": 12,
   "tokenSymbol": "UNIT"
},
"para_id": PARA_ID_HERE,
"relay_chain": "paseo",
Once you finish modifying the file, it should look like this:
{
  "name": "Custom",
  "id": "custom",
  "chainType": "Live",
  "bootNodes": [],
  "telemetryEndpoints": null,
  "protocolId": "my-live-protocol",
  "properties": {
    "ss58Format": 42,
    "tokenDecimals": 12,
    "tokenSymbol": "UNIT"
  },
  "para_id": YOUR_PARA_ID_HERE,
  "relay_chain": "paseo",
  "codeSubstitutes": {},
  "genesis": { ... }
}
Feel free to customize various aspects of your spec, such as the UNIT ticker, name, id, or
other fields.
Now you should open your chain_spec.json, and use this checklist to ensure all the necessary
fields are in place:
- Make sure that
relay_chainis set to the target relay chain (paseo, in our case) - Make sure that
para_id(right belowrelay_chain) is set to your reserved ParaId - Make sure that our
chain_typeis set toLive - Optionally, change the name, id, and token symbol of your chain.
If you fail to do one of these, your chain may fail to produce blocks.
For more information on chain specifications, check out the reference document from the Polkadot SDK.
Generating the Runtime and Genesis
With our chain specification successfully generated, we can move to generating the genesis state and runtime.
Generate the genesis following the instructions below:
polkadot-parachain export-genesis-head --chain chain_spec.json genesis
Although you can use the WebAssembly within wbuild, for ease of access you can also regenerate
your WebAssembly blob with the following:
polkadot-parachain export-genesis-wasm --chain chain_spec.json genesis-wasm
Within your project folder, you should now have two files:
genesis- the initial state of your parachain.genesis-wasm- the initial runtime WebAssembly blob of your parachain.
Running Your Collator
Make sure you have the
polkadot-parachainbinary installed!
Before you are able to connect your collator, you must sync the relay chain. Depending on your
download speed, the time to sync may vary. In order to avoid storing the full state of the relay
chain, be sure to run with the appropriate pruning flags (blocks-pruning and state-pruning):
blocks-pruning and state-pruningA Polkadot SDK-based node has two pruning modes:
blocks-pruning- Prunes block bodies (the list of extrinsics in the block) from a specified height (default:256)state-pruning- Prunes the overall state from a specified height
Both of these flags aid in reducing the amount of disk space taken up by the relay chain. Note that
state-pruning is only used for the first initial sync for the database.
polkadot-parachain --collator \
--alice \
--chain chain_spec.json \
--force-authoring \
--base-path <your-base-path-here> \
-- \
--chain=paseo \
--sync warp \
--blocks-pruning 256 \
--state-pruning 256
Fun fact: This command really spins up two nodes: your collator node for your parachain, along with an embedded relay chain node, hence the separation in the command via
--.
You should now see your relay chain syncing, reaching the same target that your target relay chain is currently at:
2024-05-07 11:43:18 [Relaychain] ⚙️ Syncing 490.8 bps, target=#10342815 (9 peers), best: #10013784 (0x91d7…aeb2), finalized #10013704 (0x8556…e679), ⬇ 8.3MiB/s ⬆ 1.2kiB/s
Register the Parachain as a Parathread
With your genesis and genesis-wasm created, you can now create your parathread. Head
back to
Network > Parachains > Parathreads (the tab)
in PolkadotJS, and click + Parathread in the top right. Now, you can upload your runtime and
genesis accordingly:
- Upload
genesis-wasmin thecodefield - Upload
genesisin theinitial statefield
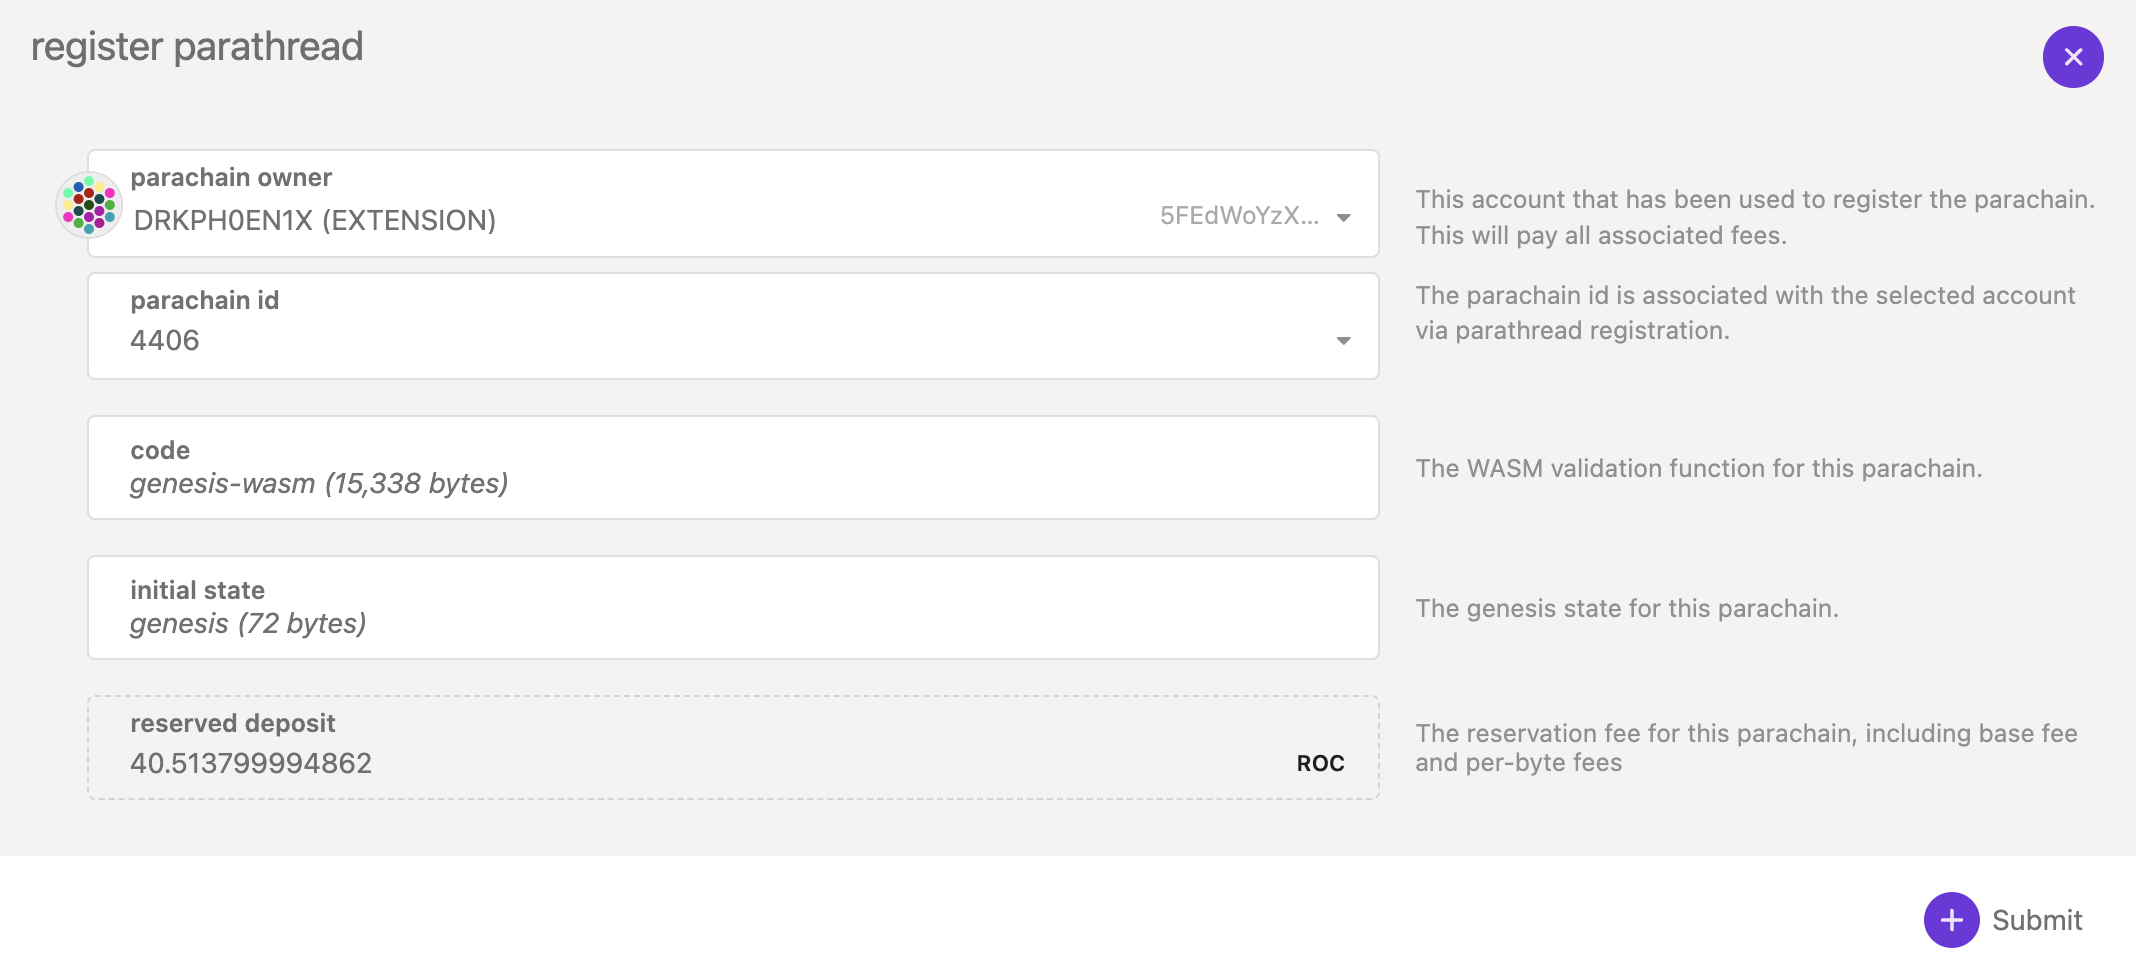
Pay the deposit, and you're good to go! Keep in mind the parathread takes around ~2 hours to onboard. You can scroll down to your ParaId to see it onboarding, for example:

Procure Coretime
** Your node should be synced with the relay before this step.**
Procuring a core is easy with coretime marketplaces already available. Visit The Coretime Marketplaces page to learn more about them, and purchase a core!
We have two options:
With bulk coretime, we assign a core to our ParaId, and as long as that core is valid, our parachain will produce blocks and finalize them via the relay chain until we have to renew the core.
It's worth noting that you can easily experiment using on-demand extrinsics, then later switch to a bulk coretime model. For now, let's start with on-demand coretime to get our first blocks going.
It is recommended that you first try an on-demand assignment, then move to a bulk assignment after you confirm your chain can create blocks!
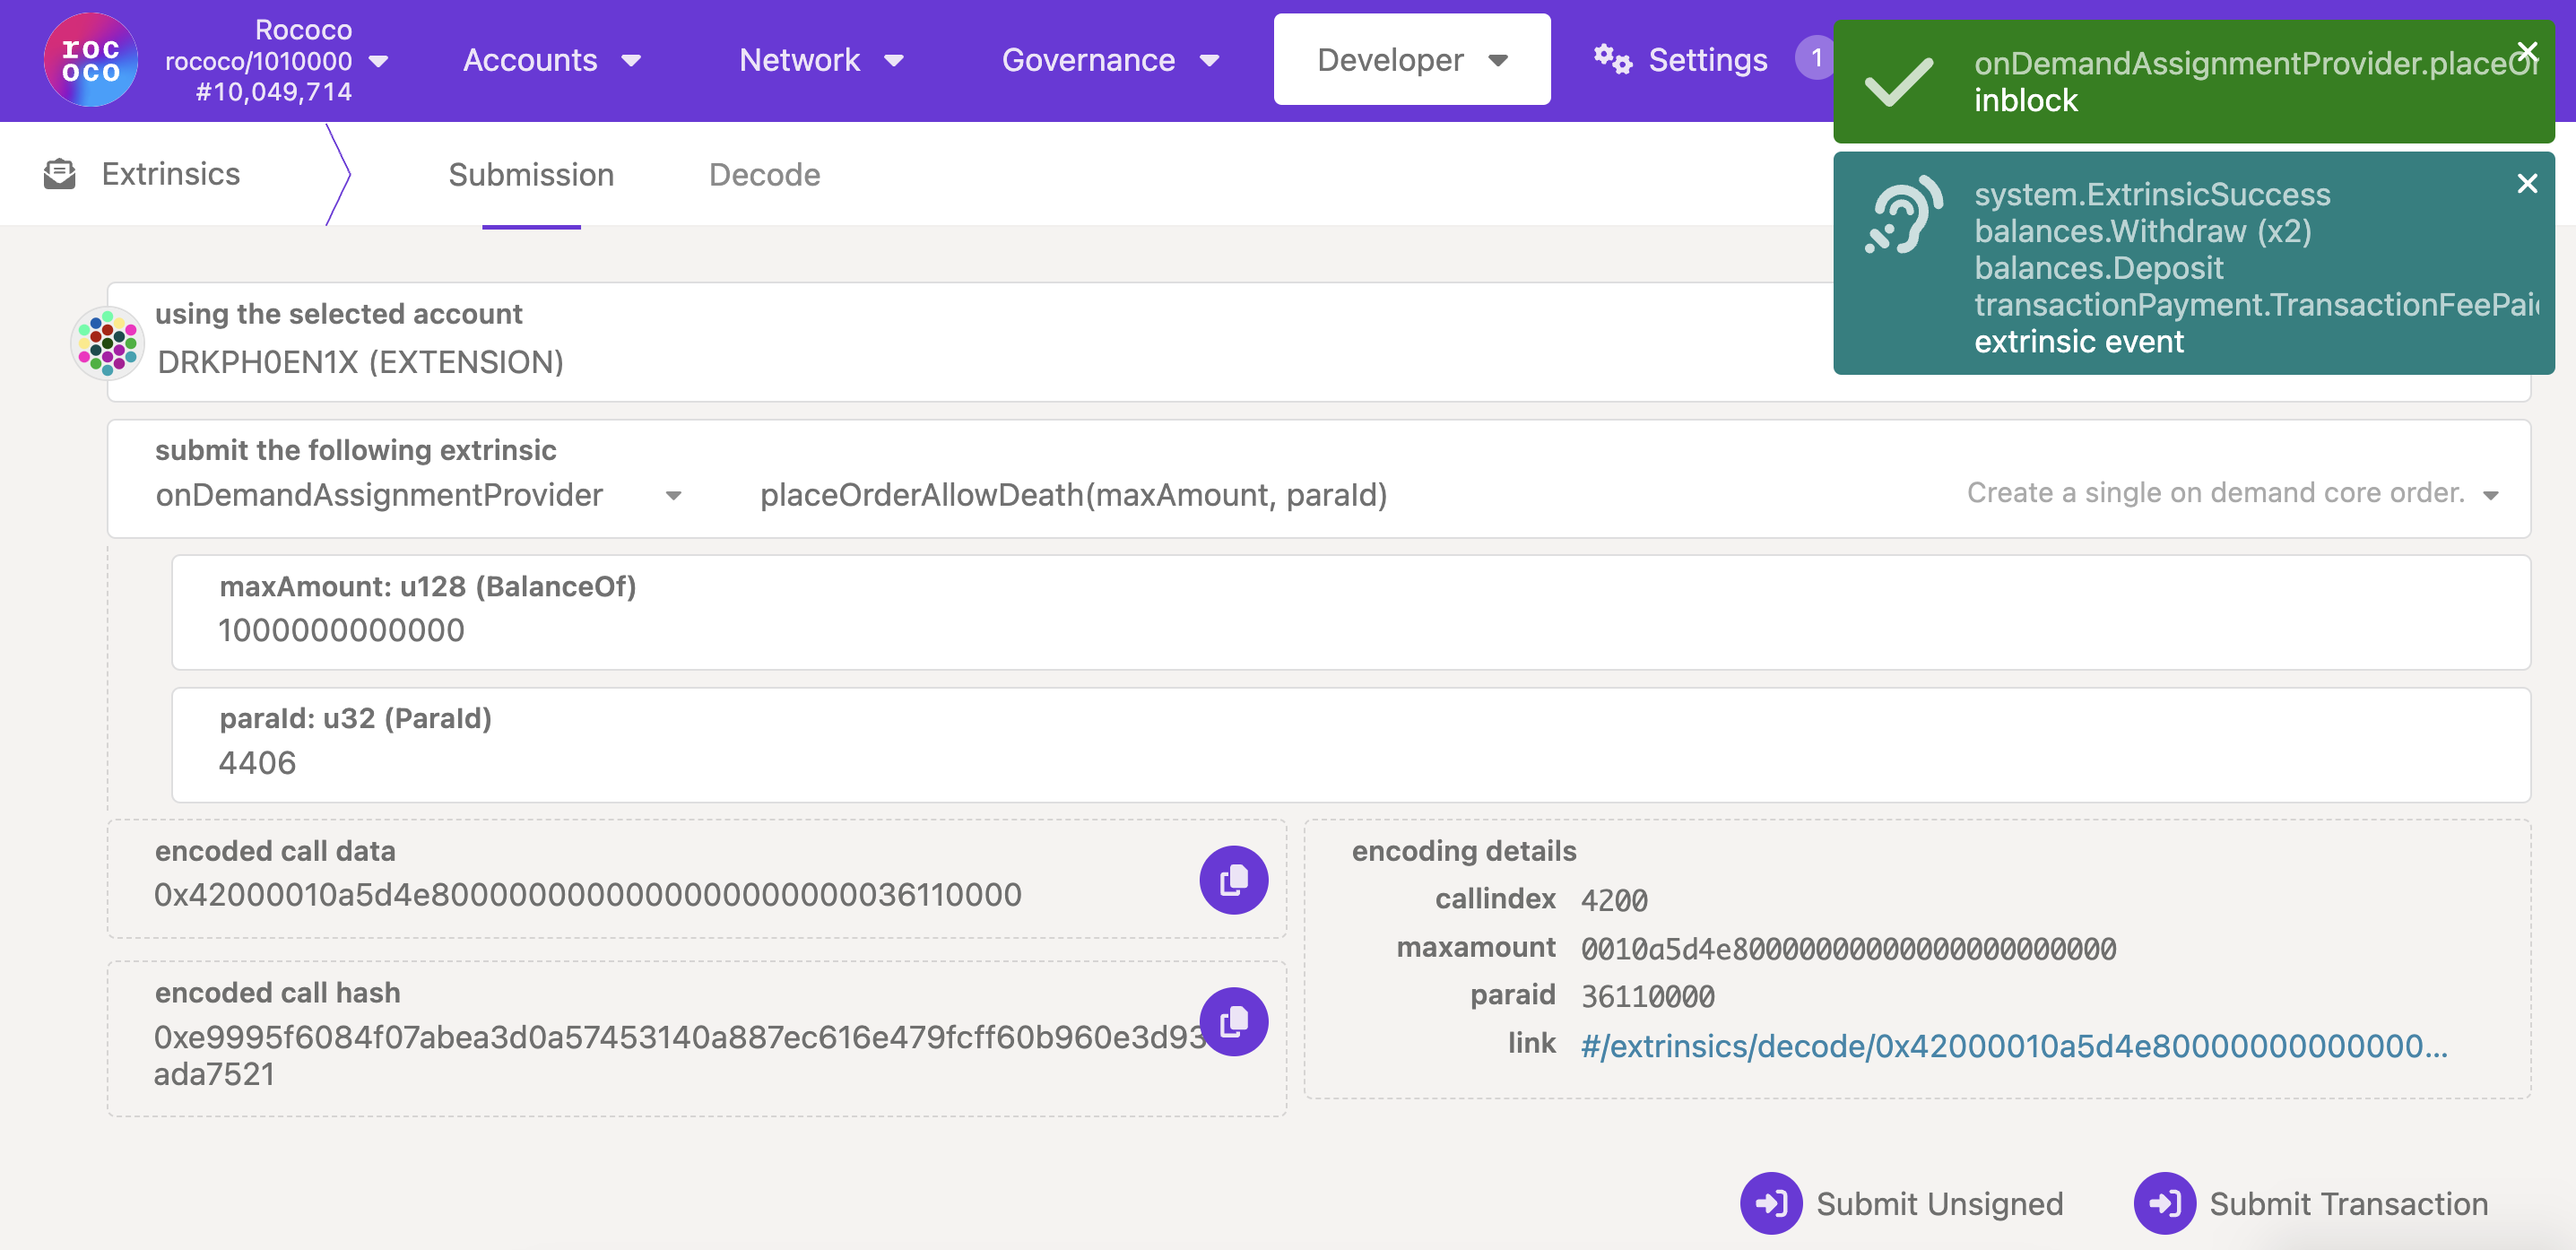
On-Demand Coretime
Provided your collator is synced, you can create a block using an on-demand extrinsic.
- Head to PolkadotJS > Extrinsics
- Issue the
onDemandAssignmentProvider.placeOrderAllowDeathextrinsic - Set the
max_amountto at least1000000000000andparaIdto your ParaId. - As long as your collator is running, you should see your block height increase from 0 to 1!
Bulk Coretime: Assigning your Core
If everything is working as intended, you can now choose to assign bulk coretime to your parachain for persistent block generation. For this assignment, RegionX's CoreHub will be used to purchase and assign cores.
In the upper right, you will see two balances: one for the relay chain, and one for the coretime chain. Before you can purchase a core, you need ROC on the coretime chain. RegionX includes a tool for doing so:
- Head to General > Cross Chain Transfer on the right, and transfer 10 ROC:
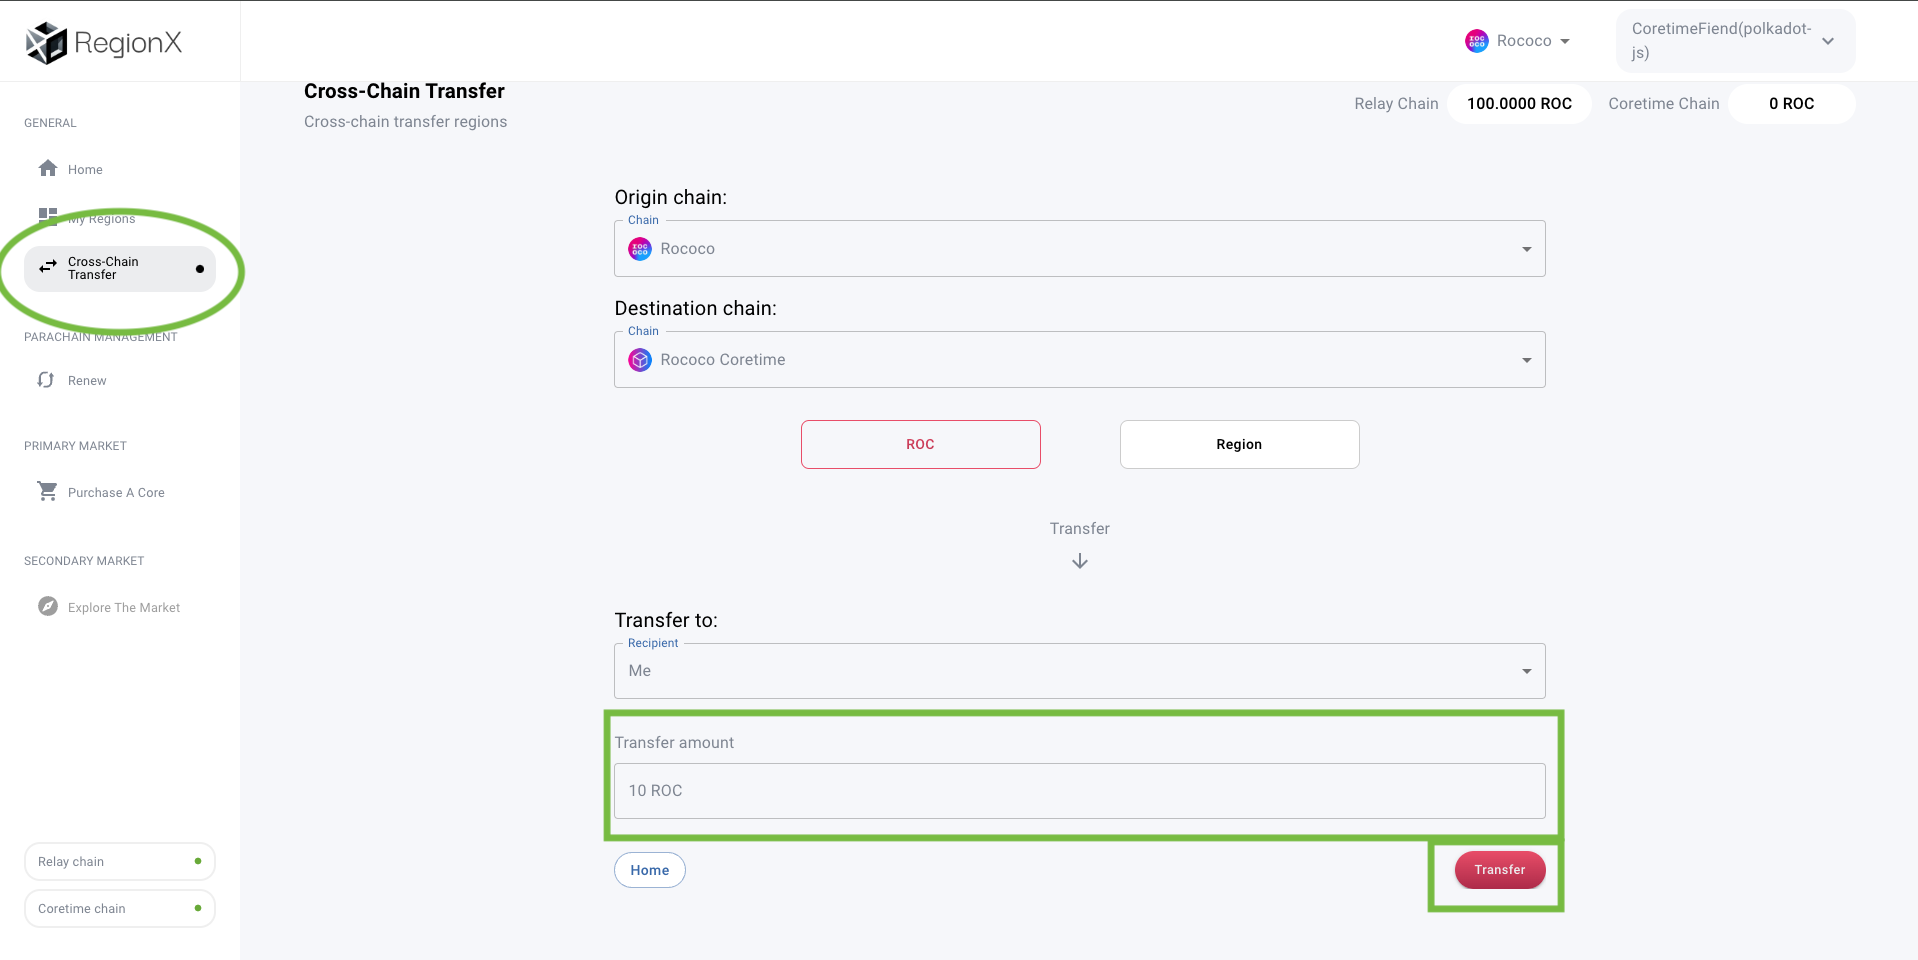
- Sign the transaction with Polkadot-JS. If all goes well, you should see the balance update in the upper right:

- Connect your wallet and make sure you select Paseo as your network:

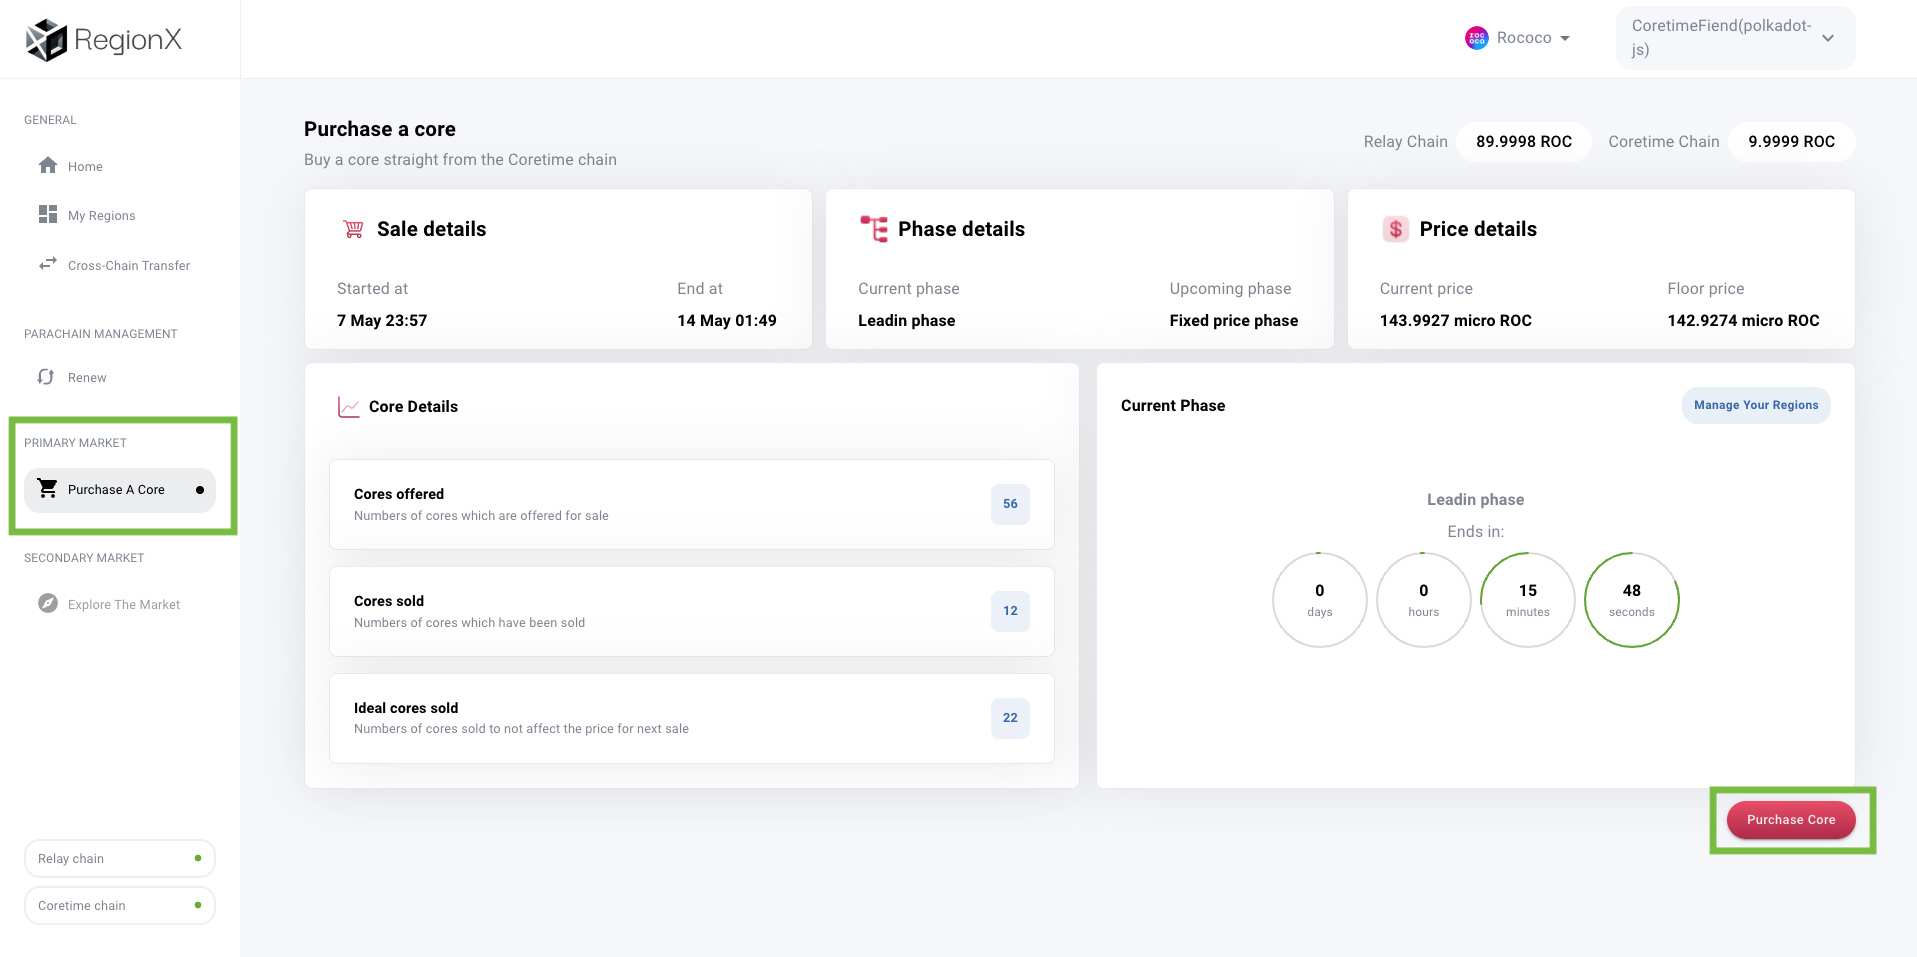
- Click Purchase a Core on the left:

- In the lower right, click "Purchase Core":
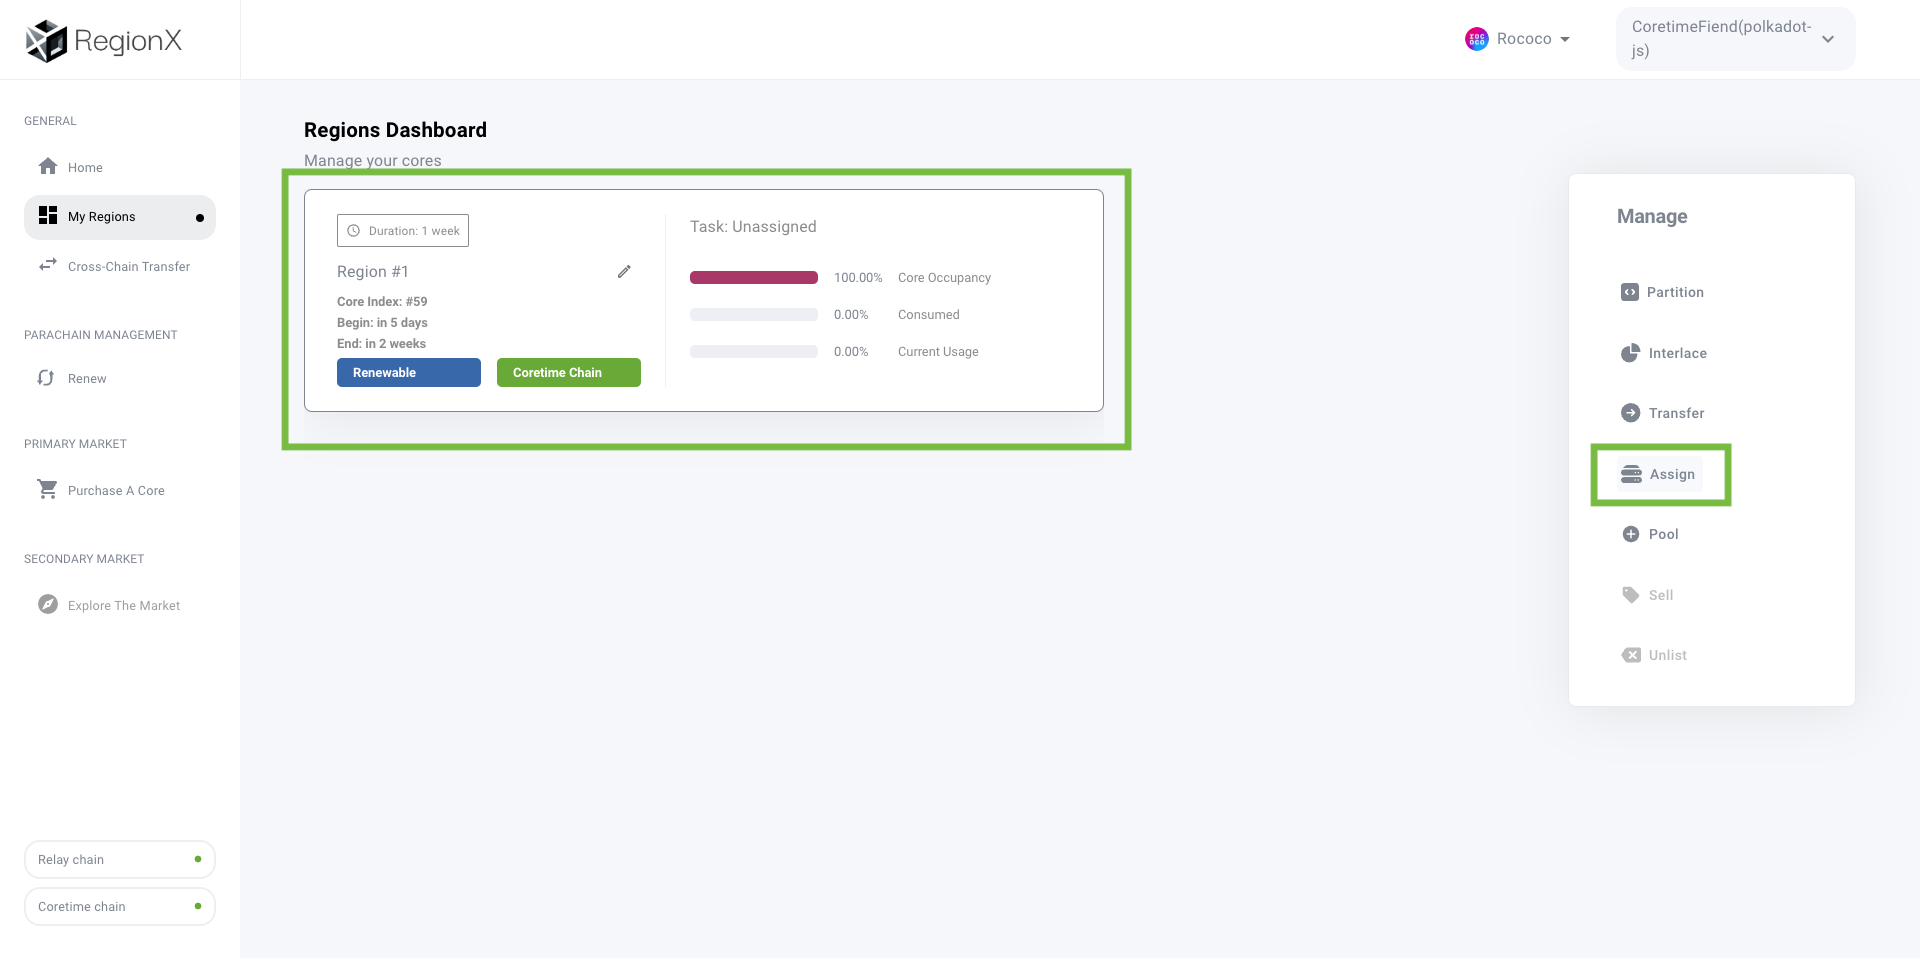
- Go to My Regions, and click to select your region, then click Assign on the right side:
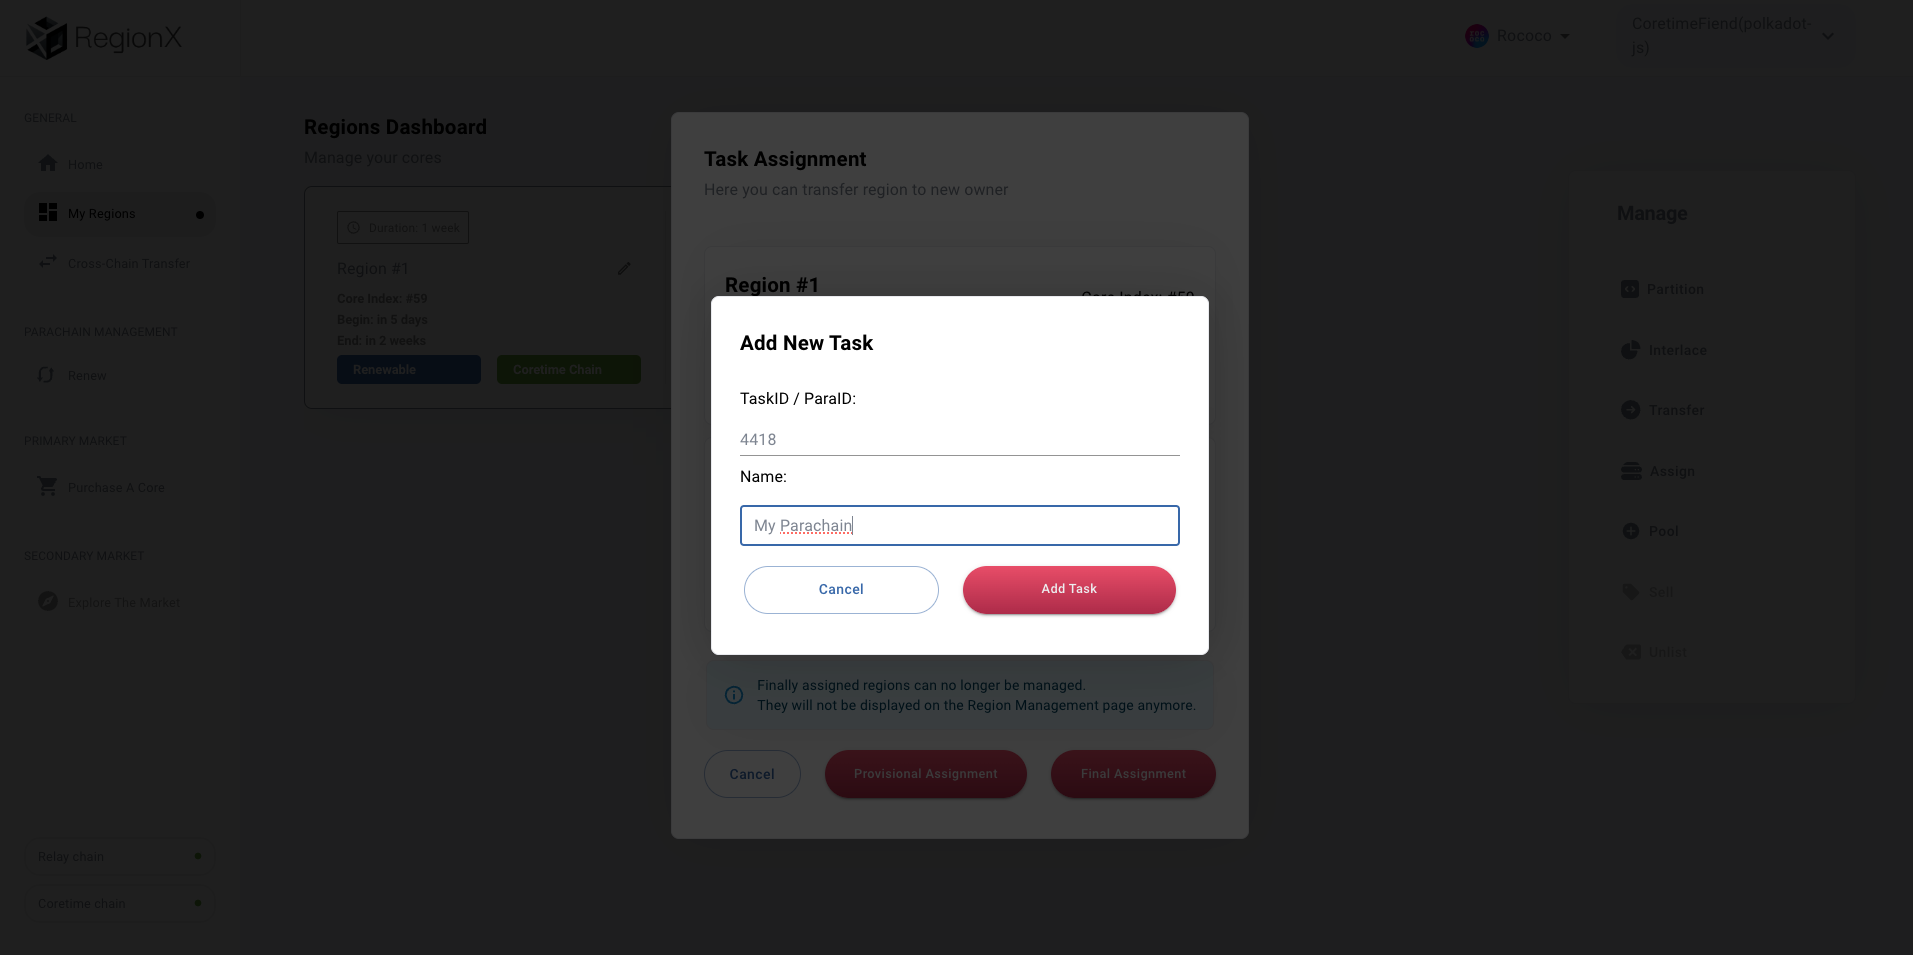
- Click Add Task, and input your ParaId along with a name for your chain:
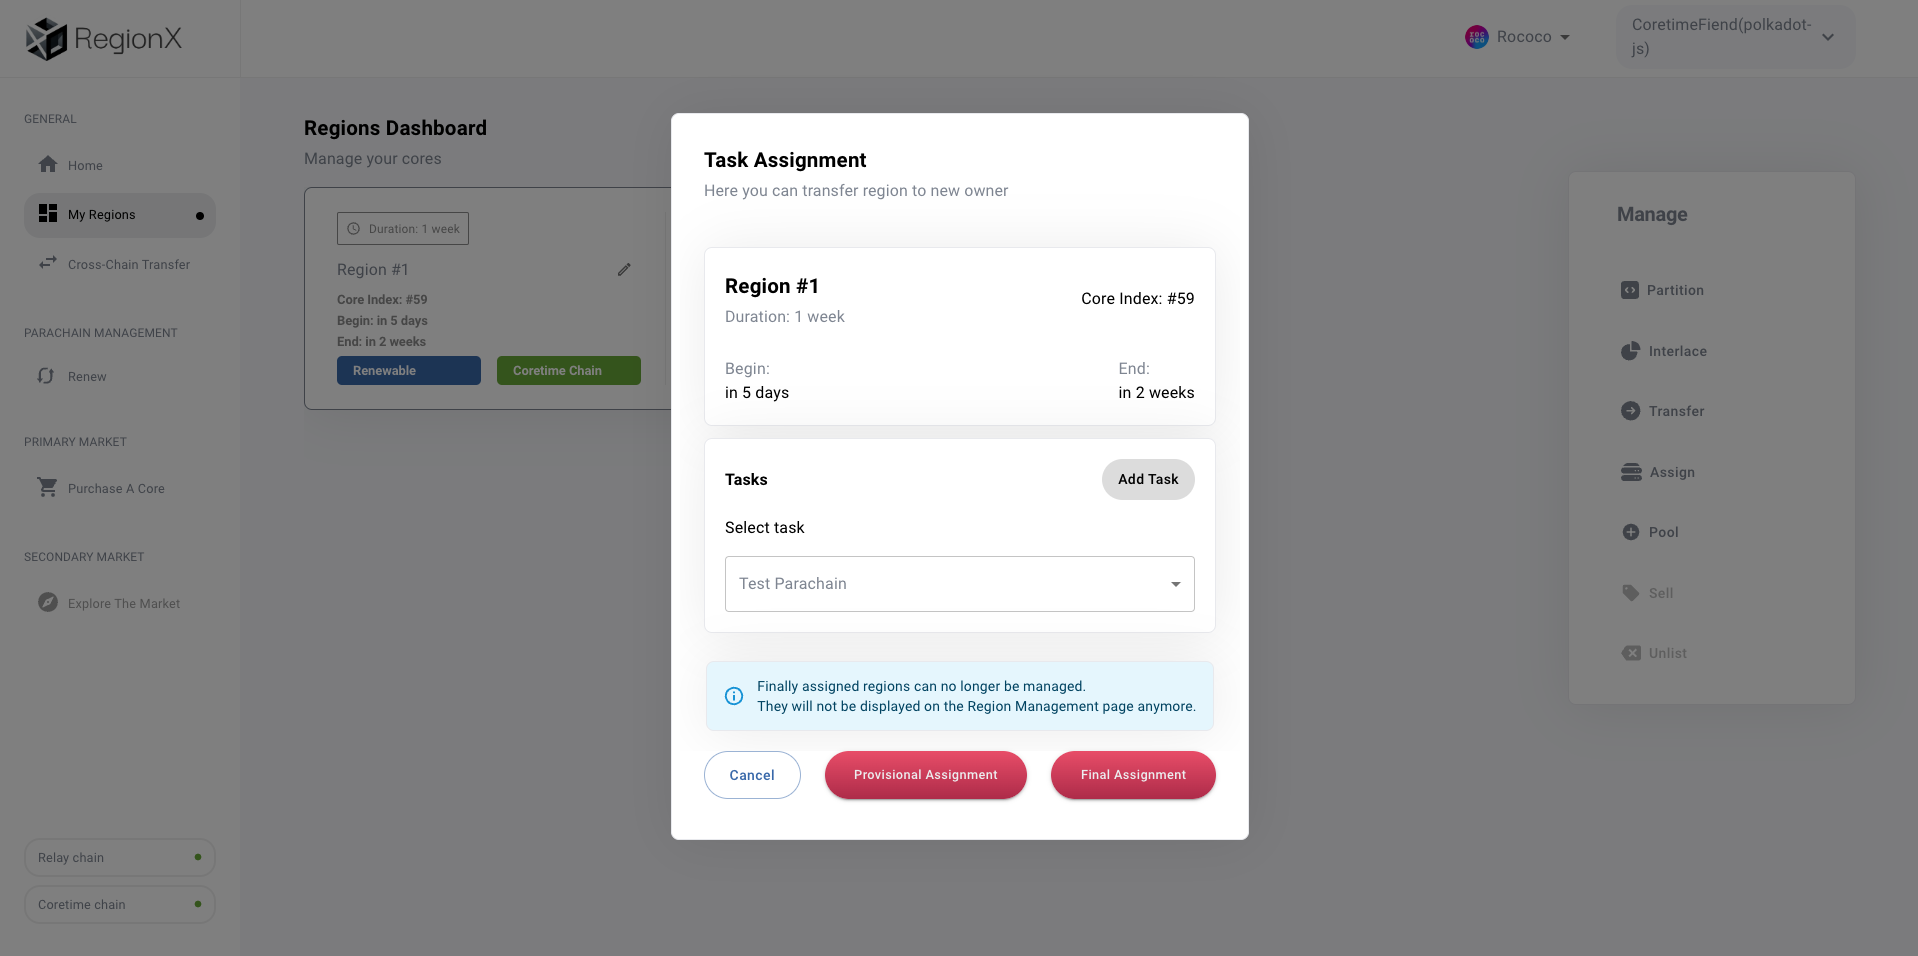
- Select your task, and select Provisional Assignment, and sign using Polkadot JS:
- Once the transaction is confirmed, provided everything is synced, your collator is running, and the region has begun, you should see blocks being persistently created as they were with the on-demand extrinsic:
What's Next?
Now that you can launch a layer one blockchain, the possibilities are endless:
- Setup a local development environment for your parachain
- Create a pallet
- Take a look at the OpenZepplin template - which has a lot more pallets configured.
- Upgrade your network